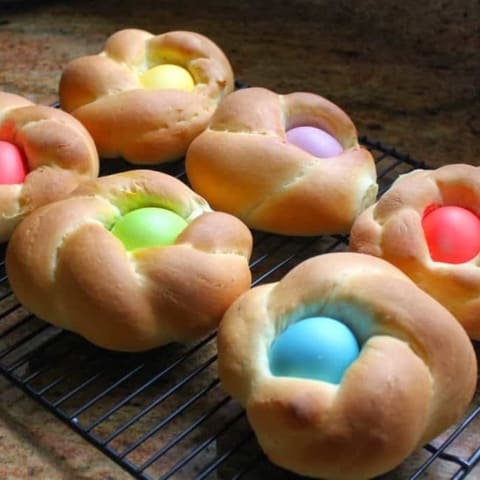
Individual Italian Easter Bread Rings are baked around an egg, and decorated with icing and sprinkles. Not only are they really easy to make, but make the perfect Italian Easter dessert. Make one large ring if you prefer, but this authentic, traditional Italian Easter bread will elate children and adults alike!

Originally published A .
Before you decide that there’s no way that you can make these lovely, individual Italian Easter bread rings, let me tell you that if you have a bread machine or stand mixer, they are very easy to make! If you don’t have either machine, the only thing is that making the dough will be a bit more time-consuming, but still easy.
As an Amazon Associate I earn from qualifying purchases.

The bread machine (the link takes you to the one I have, but there are many to choose from, starting at about $50) or a stand mixer will make the dough for you, which is the most time-consuming part. Once you have the dough, if you can roll and pinch it, you have all the necessary skills (little ones love to make these-my children helped to make them every Easter).
You may also enjoy Mrs. Rabbit’s Hot Cross Buns! Better than Mary Berry’s!

Not only are Italian Easter bread rings beautiful, but the light, airy texture of brioche-like dough perfectly partners with the sweetness of the icing. They can do double duty by providing a beautiful table decor for your Easter table, too!

Can I Make the Italian Easter Bread Dough the Night Before?
Yes, you can make it and let it rise in the fridge overnight. Here’s what to do once you’ve made the dough: don’t let it rise in the bread machine or bowl. Place it in a large container with a lid, or a sealed bowl, with sufficient space for it to rise and put it in the fridge. In the morning, proceed from the first rise (knead and shape). Try to make it as late in the day as you can as you not want the dough to overproof.
Here’s another Italian Easter bread you can try: pigna di Pasqua!

Take a look at the step by step photos and you’ll see, you can make these lovely Italian Easter bread Rings.

You may also like this recipe for a Colomba di Pasqua (Italian Easter dove bread)

IF YOU MAKE THIS RECIPE AND ENJOY THE BREAD, PLEASE LEAVE A 5 STAR RATING
IN THE RECIPE CARD BELOW ~ THANK YOU! 🙏🏻
Individual Italian Easter Bread Rings
Recipe by Christina Conte (adapted from my doughnut recipe) Makes 6 rings
Full printable recipe below
BREAD MACHINE (FOR STAND MIXER DIRECTIONS, SEE BELOW.)
Heat milk and butter gently, in a small saucepan, just until butter melts.
Remove from heat and place in bread machine pan.
Beat eggs, just to break yolks, then add to milk and butter in pan, then add the dry ingredients: flour, salt and sugar.

Make a well in the center of the dry ingredients and add the yeast.

Set machine for “dough” and press “start.”
This is what the dough should look like after it is finished kneading. It should be very soft and pliable, but not sticky. If it is very wet or very sticky, add a little flour and let it knead again.

Let rise until doubled.

IF USING A STAND MIXER: place lukewarm milk in a jug and sprinkle the yeast on top with a pinch of sugar, and allow to rest for about 5 minutes. Meanwhile, place the rest of the dry ingredients in the mixing bowl and make a well in the center. Melt the butter, (but make sure it’s not hot when you add it to the bowl or it can kill the yeast), and slightly beat the eggs in a separate bowl.
Pour the milk and yeast mixture, melted butter and beaten eggs into the well in the flour. Using the dough hook, start the machine slowly, until a dough begins to form, then increase the speed a little and allow to knead for about 10 minutes. Dough should be smooth, and a bit firm. Cover with plastic wrap and allow to rise until doubled. If it is cold in your kitchen you can place the bowl, uncovered, in your oven, along with a jug of boiling water alongside it (or just keep it covered with the plastic wrap).
If you do warm your oven at all, please just turn it on for 1 or 2 minutes, then turn it off, as the bread won’t turn out correctly if it rises under overheated conditions). These directions can also be followed if you want to make these by hand.
WHETHER USING THE BREAD MACHINE OR STAND MIXER, CONTINUE HERE…
Put the dough onto a lightly floured mat or counter and knead gently, then cut into 6 equal pieces.
Cut each of the 6 pieces in half and roll out to about 9 inches long. It doesn’t have to look pretty at this point.
Pinch one end together.
Now twist the two ropes together like this. Again, it won’t look very pretty, but it’s okay; pinch the other end together.
Next, join the ends to each other to form a ring, twisting as necessary to keep the ropes from undoing themselves. Place a colored egg into the center of the ring. If you’d like to make ONE large Italian Easter bread ring, do so by using all of the dough to make one large twisted ring. Afterwards, place the 5 eggs nestled evenly into the dough.

Place the ring on a silicone sheet or parchment lined baking tray and continue with the rest of the dough and eggs.

Once you have made all six, place them in a slightly warm oven to rise for about an hour.

After they have risen, remove the tray from the oven and turn it on to 350°F (175°C).
When the oven is at the correct temperature, bake the rings for 20 to 25 minutes or until golden brown, turning the tray midway through baking, if necessary, for even browning.
Remove from the oven and place the Italian Easter bread rings on a cooling rack.

When the bread rings are cool, mix together confectioner’s sugar, vanilla and milk to make a slightly runny glaze. Glaze rings, adjusting with more sugar or milk for correct consistency.
See the photo below: the drip in the forefront ran too quickly, so I made the icing thicker, and you can see it looks much better as it pours onto the ring.

The glaze should slowly drip down the side of the ring.

Immediately add colored sprinkles, if desired, and allow glaze to harden/dry before serving.

See? They’re not difficult to make at all!

NOTE: due to the fact that these are made from brioche dough, iced and have an egg in the middle, I don’t advise making these too far in advance. In fact, I usually have the dough ready and shape and bake them on Easter morning because I love them fresh. If you do make them in advance, try to make them the night before, but if keeping them out for longer than a few hours, or if it’s really warm, they should be refrigerated because of the egg.
Happy Easter!!
Don’t miss another post! Sign up for my free subscription for recipes and travel.
Individual Italian Easter Bread Rings...Easy Step by Step Directions
A traditional, authentic Italian Easter lightly sweet treat that the family will love. Great for children to help make.
Ingredients
- 2 eggs (6 more, colored, but still raw; DO NOT USE HARDBOILED EGGS)
- 2 Tbsp (28 g) butter
- 2/3 cup (158 ml) milk
- 3 to 3 1/2 cups (454 g) good quality all-purpose flour
- 1/4 cup (55 g) sugar
- 1 tsp sea salt
- 1 1/2 tsp bread machine dry yeast
For glaze:
- 3/4 cup (75 g) confectioner’s sugar
- about 2 Tbsp milk
- 1/2 tsp vanilla
Instructions
BREAD MACHINE DIRECTIONS (FOR STAND MIXER DIRECTIONS, SEE BELOW.)
- Heat milk and butter gently, in a small saucepan, just until butter melts.
- Remove from heat and place in bread machine pan.
- Beat 2 uncolored eggs, just to break up the yolks, then add to milk and butter in pan. Next, add the dry ingredients: flour, salt and sugar.
- Make a well in the center of the dry ingredients and add the yeast. Set machine for "dough" and press "start."
- The dough will be very soft and pliable, but not sticky. If it is very wet or very sticky, add a little flour and let it knead again. Let rise until doubled.
IF USING A STAND MIXER:
- Place lukewarm milk in a jug and sprinkle the yeast on top with a pinch of sugar, and allow to rest for about 5 minutes. Meanwhile, place the rest of the dry ingredients in the mixing bowl and make a well in the center. Melt the butter, (but make sure it's not hot when you add it to the bowl or it can kill the yeast), and slightly beat the eggs in a separate bowl.
- Pour the milk and yeast mixture, melted butter and beaten eggs into the well in the flour. Using the dough hook, start the machine slowly, until a dough begins to form, then increase the speed a little and allow to knead for about 10 minutes. Dough should be smooth, and a bit firm.
- Cover with plastic wrap and allow to rise until doubled. If it is cold in your kitchen you can place the bowl, uncovered, in your oven, along with a jug of boiling water alongside it (or just keep it covered with the plastic wrap). If you do warm your oven at all, please just turn it on for 1 or 2 minutes, then turn it off, as the bread won't turn out correctly if it rises under overheated conditions). These directions can also be followed if you want to make these by hand.
WHETHER USING THE BREAD MACHINE OR STAND MIXER, CONTINUE HERE...
- Put the dough onto a lightly floured mat or counter and knead gently, then cut into 6 equal pieces.
- Cut each of the 6 pieces in half and roll out to about 9 inches long. It doesn't have to look pretty at this point. Pinch one end together.
- Now twist the two ropes together like this. Again, it won't look very pretty, but it's okay; pinch the other end together.
- Next, join the ends to each other to form a ring, twisting as necessary to keep the ropes from undoing themselves. Place a colored egg into the center of the ring.
- (If you'd like to make ONE large Italian Easter bread ring, do so by using all of the dough to make one large twisted ring. Afterwards, place the 5 eggs nestled evenly into the dough.)
- Place the ring on a silicone sheet or parchment lined baking tray and continue with the rest of the dough and eggs.
- Once you have made all six, place them in a slightly warm oven to rise for about an hour.
- After they have risen, remove from the oven and turn the heat to 350°F (175°C).
- When oven is at the correct temperature, bake the rings for 20 to 25 minutes or until golden brown, turning the tray midway through baking if necessary for even browning.
- Remove from tray and place the Italian Easter bread rings on a cooling rack.
- When rings are cool, mix together confectioner's sugar, vanilla and milk to make a slightly runny glaze. Glaze rings, adjusting with more sugar or milk for correct consistency.
- See the photo below: the drip in the forefront ran too quickly, so I made the icing thicker, and you can see it looks much better as it pours onto the ring. The glaze should slowly drip down the side of the ring.
- Sprinkle with colored sprinkles if desired, and allow glaze to harden/dry before serving.
Notes
You can use 5 eggs and make one large braid if you don't want individual Easter bread rings.
Nutrition Information:
Yield: 6 Serving Size: 1Amount Per Serving: Calories: 391Total Fat: 7gSaturated Fat: 3gTrans Fat: 0gUnsaturated Fat: 3gCholesterol: 75mgSodium: 462mgCarbohydrates: 72gFiber: 2gSugar: 22gProtein: 10g
Nutrition info is only estimated.
Sweet Crispy Easter Pasta Nests
Casatiello (Neapolitan Easter Bread)
Christina’s Cucina is a participant in the Amazon Services LLC Associates Program, an affiliate advertising program designed to provide a means for sites to earn advertising fees by advertising and linking to Amazon.com.


I know this post is older, but it’s the prettiest picture I’ve found and I would like to give it a try. The sprinkles give it the magic I’m looking for; but I have probably the silliest question of all time: how do you eat the egg in the middle with the shell without getting it all in the bread? Do I serve these after cooked and cooled and they eat the bread around then crack the egg and eat it? I have never eaten in of these before!
Hi Adriana, I’m not sure if you realize that the egg is hard-cooked once the rings are baked? That said, what I do is pull the bread from the egg and eat it (yes, I eat a whole one at a time) and I usually don’t want to eat an egg at that time, so I put the egg in the fridge until I want to eat/use it (it’s just like a hard-boiled egg). Hope this answers your question! :) CC
Hi hoisting, can you freeze these and then frost them once they defrost out of the freezer.
Thankyou Filomena
I think the biggest reason I wouldn’t do this is that you can’t freeze hard boiled eggs. If you plan not to eat the eggs, you could (they’ll be rubbery) but it seems like such a waste :(
Hi Christina, Thankyou, I am leaving the eggs out so you think then it is okay to freeze them.
Ah, yes! It’s a bread/brioche so that would be fine. I wouldn’t keep them frozen for more than a week and definitely ice them afterwards, Filomena. Happy Easter!
Thankyou, Happy Easter ??to you and your Family??
I love these. We will also be traveling. Can I make the dough, then freeze it before raising? Thaw, then finish the process?
Hi Debbie, good question! I have never done this myself, so I can’t give you a proper answer, however it seems as though it should work. I’ll have to try to freeze some of the dough when I make them next to test it out myself. Let me know if you try it, too! Good luck!
Isn’t this just a great idea? However, I travel during Easter, so making fresh treats is hard! I have made these with the regular eggs, but then take the egg out (make egg salad?) and replaced the real egg with a plastic Easter egg filled with treats! (use a little icing on the bottom so it stays in place). Still the same effect, but no spoilage problem. A slightly modern twist on a traditional treat! The kids love them, and the bread part is delicious as ever!
That’s a brilliant idea! Thank you for sharing!
I adore these. my aunt makes them and the egg is not cooked through so when you peel them you can dip the sweet bread into the yoke. it is an ideal breakfast for me.
Hi Alma, I don’t cook the egg in this recipe either, but the egg gets baked (cooked) completely. So glad you know about these beauties! :)
What is the best way to store these? I wanted to make them tonight for serving tomorrow. Can I bake them tonight, store them (suggestions?) and then glaze the next day?
Yes Stacy, if you bake them tonight, just store them in a cool place, glazed or unglazed. If they are completely cool tonight, I’d suggest glazing them tonight that way the icing is not sticky tomorrow when you serve them. It takes quite a few hours to harden. If they are not eaten tomorrow, remove the egg and put it in the fridge as I wouldn’t advise keeping the hard baked egg out for more than the next day. Happy Easter! CC
Thanks for the quick reply. The breads are STUNNING, and delicious. Happy Easter.
You’re welcome! Send me a photo if you can! :) Enjoy!
Sure! What’s your email?
These are just beautiful! Thank you for sharing.
Just out of curiosity, do the eggs end up “hard-boiled” after baking? Or are they still soft in the middle?
Thank you, Greta! They are “hard-baked” :) One reader said his were still a bit soft in the middle, but I think that would be due to the oven temperature or not leaving them in long enough. I have never had that problem. Let me know how they turn out! :) Happy Easter!
I’m so excited to do this, and I WILL be making it this year. I actually come from a very proud Italian family and I am so surprised my grandma never made this! I saw Buddy Valastro make this on his show and knew I needed to do it but I am always so intimidated by the yeast. I never have good luck with yeast. Is the yeast for bread machines different from the active dry yeast? And if I’m using a stand mixer I just do it the same as the recipe for bread machine, right?
Hi Britney, so glad you’re going to be making these! As long as you have FRESH yeast (as in, not old or expired) your yeast will work for you. Bread machine yeast is specifically made for use in bread machines and I have no idea what is different about it, but the active dry yeast can be used in the exact same way. If you are using a stand mixer, warm the milk slightly (lukewarm; if it is too hot, it will kill the yeast) then sprinkle the yeast into the milk and allow to stand for a few minutes. Then you can put all the dry ingredients into the bowl and make a well. Add the liquid ingredients and eggs to the well and away you go! Let the machine knead the bread for at least 10 minutes after a dough is formed, then cover the dough with plastic wrap to rise. Follow the shaping directions as with the recipe. Good luck and Happy Easter! Send a pic if you like! CC