

Individual Italian Easter Bread Rings…Easy Step by Step Directions
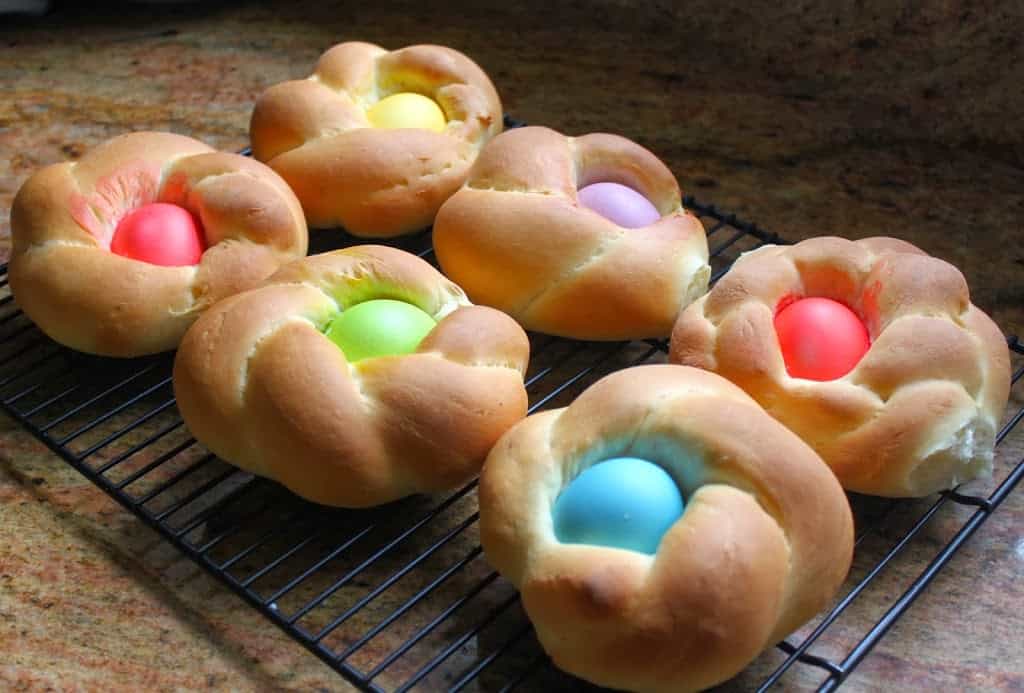
Individual Italian Easter Bread Rings are baked around an egg, and decorated with icing and sprinkles. Not only are they really easy to make, but make the perfect Italian Easter dessert. Make one large ring if you prefer, but this authentic, traditional Italian Easter bread will elate children and adults alike!

Originally published A .
Before you decide that there’s no way that you can make these lovely, individual Italian Easter bread rings, let me tell you that if you have a bread machine or stand mixer, they are very easy to make! If you don’t have either machine, the only thing is that making the dough will be a bit more time-consuming, but still easy.
As an Amazon Associate I earn from qualifying purchases.

The bread machine (the link takes you to the one I have, but there are many to choose from, starting at about $50) or a stand mixer will make the dough for you, which is the most time-consuming part. Once you have the dough, if you can roll and pinch it, you have all the necessary skills (little ones love to make these-my children helped to make them every Easter).
You may also enjoy Mrs. Rabbit’s Hot Cross Buns! Better than Mary Berry’s!

Not only are Italian Easter bread rings beautiful, but the light, airy texture of brioche-like dough perfectly partners with the sweetness of the icing. They can do double duty by providing a beautiful table decor for your Easter table, too! Check out my collection of Easter dessert recipes, too.

Can I Make the Italian Easter Bread Dough the Night Before?
Yes, you can make it and let it rise in the fridge overnight. Here’s what to do once you’ve made the dough: don’t let it rise in the bread machine or bowl. Place it in a large container with a lid, or a sealed bowl, with sufficient space for it to rise and put it in the fridge. In the morning, proceed from the first rise (knead and shape).
These springtime Easter cookies can be made well in advance.

Try to make it as late in the day as you can as you not want the dough to overproof.
Here’s another Italian Easter bread you can try: pigna di Pasqua!

Take a look at the step by step photos and you’ll see, you can make these lovely Italian Easter bread Rings.

You may also like this recipe for a Colomba di Pasqua (Italian Easter dove bread)

IF YOU MAKE THIS RECIPE AND ENJOY THE BREAD, PLEASE LEAVE A 5 STAR RATING
IN THE RECIPE CARD BELOW ~ THANK YOU! 🙏🏻
Individual Italian Easter Bread Rings
Recipe by Christina Conte (adapted from my doughnut recipe) Makes 6 rings
FULL PRINTABLE RECIPE BELOW
Ingredients
- eggs
- butter
- milk
- flour
- sugar
- salt
- yeast
- confectioner’s sugar
- milk
- vanilla
- (food coloring for eggs)
Directions
BREAD MACHINE (FOR STAND MIXER DIRECTIONS, SEE BELOW.)
Heat milk and butter gently, in a small saucepan, just until butter melts.
Remove from heat and place in bread machine pan.
Beat eggs, just to break yolks, then add to milk and butter in pan, then add the dry ingredients: flour, salt and sugar.

Make a well in the center of the dry ingredients and add the yeast.

Set machine for “dough” and press “start.”
This is what the dough should look like after it is finished kneading. It should be very soft and pliable, but not sticky. If it is very wet or very sticky, add a little flour and let it knead again.

Let rise until doubled.

IF USING A STAND MIXER: place lukewarm milk in a jug and sprinkle the yeast on top with a pinch of sugar, and allow to rest for about 5 minutes. Meanwhile, place the rest of the dry ingredients in the mixing bowl and make a well in the center. Melt the butter, (but make sure it’s not hot when you add it to the bowl or it can kill the yeast), and slightly beat the eggs in a separate bowl.
Pour the milk and yeast mixture, melted butter and beaten eggs into the well in the flour. Using the dough hook, start the machine slowly, until a dough begins to form, then increase the speed a little and allow to knead for about 10 minutes. Dough should be smooth, and a bit firm. Cover with plastic wrap and allow to rise until doubled. If it is cold in your kitchen you can place the bowl, uncovered, in your oven, along with a jug of boiling water alongside it (or just keep it covered with the plastic wrap).
If you do warm your oven at all, please just turn it on for 1 or 2 minutes, then turn it off, as the bread won’t turn out correctly if it rises under overheated conditions). These directions can also be followed if you want to make these by hand.
WHETHER USING THE BREAD MACHINE OR STAND MIXER, CONTINUE HERE…
Put the dough onto a lightly floured mat or counter and knead gently, then cut into 6 equal pieces.
Cut each of the 6 pieces in half and roll out to about 9 inches long. It doesn’t have to look pretty at this point.
Pinch one end together.
Now twist the two ropes together like this. Again, it won’t look very pretty, but it’s okay; pinch the other end together.
Next, join the ends to each other to form a ring, twisting as necessary to keep the ropes from undoing themselves. Place a colored egg into the center of the ring. If you’d like to make ONE large Italian Easter bread ring, do so by using all of the dough to make one large twisted ring. Afterwards, place the 5 eggs nestled evenly into the dough.

Place the ring on a silicone sheet or parchment lined baking tray and continue with the rest of the dough and eggs.

Once you have made all six, place them in a slightly warm oven to rise for about an hour.

After they have risen, remove the tray from the oven and turn it on to 350°F (175°C).
When the oven is at the correct temperature, bake the rings for 20 to 25 minutes or until golden brown, turning the tray midway through baking, if necessary, for even browning.
Remove from the oven and place the Italian Easter bread rings on a cooling rack.

When the bread rings are cool, mix together confectioner’s sugar, vanilla and milk to make a slightly runny glaze. Glaze rings, adjusting with more sugar or milk for correct consistency.
See the photo below: the drip in the forefront ran too quickly, so I made the icing thicker, and you can see it looks much better as it pours onto the ring.

The glaze should slowly drip down the side of the ring.

Immediately add colored sprinkles, if desired, and allow glaze to harden/dry before serving.

See? They’re not difficult to make at all!

NOTE: due to the fact that these are made from brioche dough, iced and have an egg in the middle, I don’t advise making these too far in advance. In fact, I usually have the dough ready and shape and bake them on Easter morning because I love them fresh. If you do make them in advance, try to make them the night before, but if keeping them out for longer than a few hours, or if it’s really warm, they should be refrigerated because of the egg.
Happy Easter!!
Don’t miss another post! Sign up for my free subscription for recipes and travel.
Individual Italian Easter Bread Rings...Easy Step by Step Directions
Ingredients
- 8 eggs 6 should be colored, but still raw; DO NOT USE HARDBOILED EGGS
- 2 Tbsp butter
- ⅔ cup milk
- 3 cups all-purpose flour or more as needed
- ¼ cup sugar
- 1 tsp sea salt
- 1 ½ tsp dry yeast (for bread machine)
For glaze:
- ¾ cup confectioner’s sugar
- 2 Tbsp milk
- ½ tsp vanilla
Instructions
BREAD MACHINE DIRECTIONS (FOR STAND MIXER DIRECTIONS, SEE BELOW.)
- Heat milk and butter gently, in a small saucepan, just until butter melts.
- Remove from heat and place in bread machine pan.
- Beat 2 uncolored eggs, just to break up the yolks, then add to milk and butter in pan. Next, add the dry ingredients: flour, salt and sugar.
- Make a well in the center of the dry ingredients and add the yeast. Set machine for "dough" and press "start."
- The dough will be very soft and pliable, but not sticky. If it is very wet or very sticky, add a little flour and let it knead again. Let rise until doubled.
IF USING A STAND MIXER:
- Place lukewarm milk in a jug and sprinkle the yeast on top with a pinch of sugar, and allow to rest for about 5 minutes. Meanwhile, place the rest of the dry ingredients in the mixing bowl and make a well in the center. Melt the butter, (but make sure it's not hot when you add it to the bowl or it can kill the yeast), and slightly beat the eggs in a separate bowl.
- Pour the milk and yeast mixture, melted butter and beaten eggs into the well in the flour. Using the dough hook, start the machine slowly, until a dough begins to form, then increase the speed a little and allow to knead for about 10 minutes. Dough should be smooth, and a bit firm.
- Cover with plastic wrap and allow to rise until doubled. If it is cold in your kitchen you can place the bowl, uncovered, in your oven, along with a jug of boiling water alongside it (or just keep it covered with the plastic wrap). If you do warm your oven at all, please just turn it on for 1 or 2 minutes, then turn it off, as the bread won't turn out correctly if it rises under overheated conditions). These directions can also be followed if you want to make these by hand.
WHETHER USING THE BREAD MACHINE OR STAND MIXER, CONTINUE HERE...
- Put the dough onto a lightly floured mat or counter and knead gently, then cut into 6 equal pieces.
- Cut each of the 6 pieces in half and roll out to about 9 inches long. It doesn't have to look pretty at this point. Pinch one end together.
- Now twist the two ropes together like this. Again, it won't look very pretty, but it's okay; pinch the other end together.
- Next, join the ends to each other to form a ring, twisting as necessary to keep the ropes from undoing themselves. Place a colored egg into the center of the ring.
- (If you'd like to make ONE large Italian Easter bread ring, do so by using all of the dough to make one large twisted ring. Afterwards, place the 5 eggs nestled evenly into the dough.)
- Place the ring on a silicone sheet or a parchment lined baking sheet and continue with the rest of the dough and eggs.
- Once you have made all six, place them in a slightly warm oven to rise for about an hour.
- After they have risen, remove from the oven and turn the heat to 350°F (175°C).
- When oven is at the correct temperature, bake the rings for 20 to 25 minutes or until golden brown, turning the tray midway through baking if necessary for even browning.
- Remove from tray and place the Italian Easter bread rings on a cooling rack.
- When rings are cool, mix together confectioner's sugar, vanilla and milk to make a slightly runny glaze. Glaze rings, adjusting with more sugar or milk for correct consistency.
- See the photo below: the drip in the forefront ran too quickly, so I made the icing thicker, and you can see it looks much better as it pours onto the ring. The glaze should slowly drip down the side of the ring.
- Sprinkle with colored sprinkles if desired, and allow glaze to harden/dry before serving.
Notes
- You can use 5 eggs and make one large braid if you don't want individual Easter bread rings.
Nutrition
More Italian Easter recipes ~
Sweet Crispy Easter Pasta Nests
Casatiello (Neapolitan Easter Bread)
Christina’s Cucina is a participant in the Amazon Services LLC Associates Program, an affiliate advertising program designed to provide a means for sites to earn advertising fees by advertising and linking to Amazon.com.
I LOVE making Easter Nests oh so good
But I put a spin with the dough. I add a handful of my Fig cookie mixture to it and mix throughly. It adds a kick once backed
That’s just what I do. I always make sure I have a container of it in my fridge
How to make tea with bags and loose leaf. I LOVE my tea, cold or hot. I’ve always used my medium pot and just use my stove
Tea pot give away. 🙋🏼♀️🙋🏼♀️🙋🏼♀️🙋🏼♀️🙋🏼♀️ choose me, please.
Hi Elizabeth, so glad you like the Easter nests! Could you please comment on either of the tea recipes which I shared? I never “pick” a winner, it’s by luck on the “Wheel of Names” however, if you did happen to win and others wouldn’t see your comment there, it would seem that I did “pick” you. Could you please add your comment below the tea posts to enter? Thank you!
Hi Christina, I’d like to have a go at baking this as one big one, as I remember my mum making it like that.
We knew it as “Corona di Pasqua”… the shape is meant to represent the “crown” of thorns put on Jesus’ head… hence, the name. But mum’s didn’t have icing on it… just the eggs. She also sometimes made it long… as a braid… known then as “Treccia di Pasqua”, but the corona was more traditional.
Anyhow, I’m a bit confused by the post… the ingredients list notes 2 eggs (+ 6 to put in each individual ring)… and at point #5 it says if you want to make one big one, you can just use all the dough to make it… so far, so good. But then down in the Notes section, it says to use 5 eggs to make 1 large braid???
So the number of eggs is the part I’m confused about…
To make one large crown, do I use 2 eggs or 5 eggs in the dough? (I know I will need additional, raw eggs for decorating the crown)
I’m hoping you happen to notice my question in time for me to bake this for Good Friday (which falls on 29th March this year here in Melbourne, Australia).
Keep the great recipes coming! They make me smile, remembering my mamma!
Oops, my mistake, sorry Wendy. So make the dough exactly the same for 6 individual rings or one big one. The only difference is that you need 6 eggs for individual rings, but only 5 for the big one (an odd number looks best and I doubt 6 would fit!) Thank you and hope you have a lovely Easter, thank you for your kind comments! xx
Thank you for your speedy reply, Christina! I really appreciate it!
Yes, I agree, I think an odd number of eggs will look better… similar to how when you go to a florist to buy a bunch of flowers, they are almost always an odd number, because the flowers then “sit” better :)
Thank you again – and happy Easter to you, too! xx
Oh you’re most welcome! I’m usually good about replying unless I’m traveling. :)
Am I missing something? this recipe only uses 2 tablespoons if butter?
Missing nothing, Maria. This has been made by hundreds (if not thousands) of people around the world with great results. It’s a solid recipe. Give it a try! :) (PS I don’t post recipes willy-nilly like some sites, mine are all either passed down from family or ones I love.)
Hello.
These are so beautiful and lured me in to a long, stressy day of bread making. I was very pleased with how my dough turned out! I added some orange & lemon zest. I was disappointed with my glaze as the vanilla made it beige so not as pretty as your bright white! Still tasted good. Bad part was I had to make them Friday because we were traveling Saturday and taking them along. So we kept them cool (and the glaze sweated :-/ )
We did have one issue, the eggs weren’t totally solid! :-o
So that was a bummer. They were in the oven for 20 minutes… so I thought they’d be fine.
And I’m sad as the family has hardly eaten any of them. And I overheard them talking about them being dry. I think they were expecting them to be more like donuts? sweeter? not simply bread…. idk. But it hurt my feelings a little as I thought they were so beautiful and I worked hard (doubled the recipe) trying to make something special.
Oh well, lesson learned. I still think they’re so pretty!
Thanks for the recipe!
Happy Easter/Spring
Awww, that is sad, Heather! I’m sorry about that; it’s not nice to feel unappreciated. I can definitely say that if you made them on Friday and ate them on Sunday, they’d definitely be dry, though, especially keeping them in the fridge. These really are best eaten the same day, at latest the next. Maybe let your family know in a kind way that your feelings were hurt? Happy Easter to you, too and take heart, you did your best.
Thanks for your thoughts, kind words & advice. It’s fine, these things happen.
BUT:
Do you have any thoughts on why my eggs weren’t quite done? They were in for 20 minutes and the bread itself wouldn’t have withstood any longer baking.
Also my glaze not being bright white after adding vanilla – I did add extra powdered sugar to firm it up, but that only lightened it slightly.
And again, they were still so beautiful & I thought tasty.
Were your eggs are room temperature? I would assume so given the rise time, but maybe they still weren’t at room temperature when you put them in. Is your oven calibrated to the correct temperature? I would check.
Regarding the glaze, I don’t know if your vanilla is a darker color than what I use, but the photos you see are made with ½ tsp of vanilla in the glaze. The only other option is not to use vanilla. You can use water and lemon juice to make the same glaze. Hope this helps.
Thanks!