

Individual Italian Easter Bread Rings…Easy Step by Step Directions
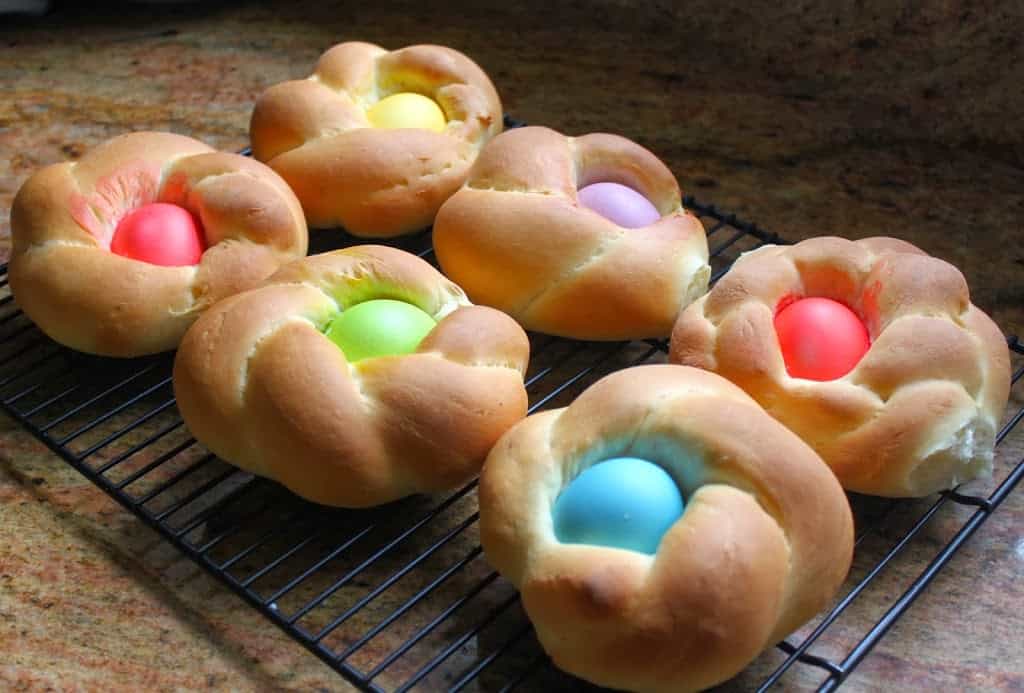
Individual Italian Easter Bread Rings are baked around an egg, and decorated with icing and sprinkles. Not only are they really easy to make, but make the perfect Italian Easter dessert. Make one large ring if you prefer, but this authentic, traditional Italian Easter bread will elate children and adults alike!

Originally published A .
Before you decide that there’s no way that you can make these lovely, individual Italian Easter bread rings, let me tell you that if you have a bread machine or stand mixer, they are very easy to make! If you don’t have either machine, the only thing is that making the dough will be a bit more time-consuming, but still easy.
As an Amazon Associate I earn from qualifying purchases.

The bread machine (the link takes you to the one I have, but there are many to choose from, starting at about $50) or a stand mixer will make the dough for you, which is the most time-consuming part. Once you have the dough, if you can roll and pinch it, you have all the necessary skills (little ones love to make these-my children helped to make them every Easter).
You may also enjoy Mrs. Rabbit’s Hot Cross Buns! Better than Mary Berry’s!

Not only are Italian Easter bread rings beautiful, but the light, airy texture of brioche-like dough perfectly partners with the sweetness of the icing. They can do double duty by providing a beautiful table decor for your Easter table, too! Check out my collection of Easter dessert recipes, too.

Can I Make the Italian Easter Bread Dough the Night Before?
Yes, you can make it and let it rise in the fridge overnight. Here’s what to do once you’ve made the dough: don’t let it rise in the bread machine or bowl. Place it in a large container with a lid, or a sealed bowl, with sufficient space for it to rise and put it in the fridge. In the morning, proceed from the first rise (knead and shape).
These springtime Easter cookies can be made well in advance.

Try to make it as late in the day as you can as you not want the dough to overproof.
Here’s another Italian Easter bread you can try: pigna di Pasqua!

Take a look at the step by step photos and you’ll see, you can make these lovely Italian Easter bread Rings.

You may also like this recipe for a Colomba di Pasqua (Italian Easter dove bread)

IF YOU MAKE THIS RECIPE AND ENJOY THE BREAD, PLEASE LEAVE A 5 STAR RATING
IN THE RECIPE CARD BELOW ~ THANK YOU! 🙏🏻
Individual Italian Easter Bread Rings
Recipe by Christina Conte (adapted from my doughnut recipe) Makes 6 rings
FULL PRINTABLE RECIPE BELOW
Ingredients
- eggs
- butter
- milk
- flour
- sugar
- salt
- yeast
- confectioner’s sugar
- milk
- vanilla
- (food coloring for eggs)
Directions
BREAD MACHINE (FOR STAND MIXER DIRECTIONS, SEE BELOW.)
Heat milk and butter gently, in a small saucepan, just until butter melts.
Remove from heat and place in bread machine pan.
Beat eggs, just to break yolks, then add to milk and butter in pan, then add the dry ingredients: flour, salt and sugar.

Make a well in the center of the dry ingredients and add the yeast.

Set machine for “dough” and press “start.”
This is what the dough should look like after it is finished kneading. It should be very soft and pliable, but not sticky. If it is very wet or very sticky, add a little flour and let it knead again.

Let rise until doubled.

IF USING A STAND MIXER: place lukewarm milk in a jug and sprinkle the yeast on top with a pinch of sugar, and allow to rest for about 5 minutes. Meanwhile, place the rest of the dry ingredients in the mixing bowl and make a well in the center. Melt the butter, (but make sure it’s not hot when you add it to the bowl or it can kill the yeast), and slightly beat the eggs in a separate bowl.
Pour the milk and yeast mixture, melted butter and beaten eggs into the well in the flour. Using the dough hook, start the machine slowly, until a dough begins to form, then increase the speed a little and allow to knead for about 10 minutes. Dough should be smooth, and a bit firm. Cover with plastic wrap and allow to rise until doubled. If it is cold in your kitchen you can place the bowl, uncovered, in your oven, along with a jug of boiling water alongside it (or just keep it covered with the plastic wrap).
If you do warm your oven at all, please just turn it on for 1 or 2 minutes, then turn it off, as the bread won’t turn out correctly if it rises under overheated conditions). These directions can also be followed if you want to make these by hand.
WHETHER USING THE BREAD MACHINE OR STAND MIXER, CONTINUE HERE…
Put the dough onto a lightly floured mat or counter and knead gently, then cut into 6 equal pieces.
Cut each of the 6 pieces in half and roll out to about 9 inches long. It doesn’t have to look pretty at this point.
Pinch one end together.
Now twist the two ropes together like this. Again, it won’t look very pretty, but it’s okay; pinch the other end together.
Next, join the ends to each other to form a ring, twisting as necessary to keep the ropes from undoing themselves. Place a colored egg into the center of the ring. If you’d like to make ONE large Italian Easter bread ring, do so by using all of the dough to make one large twisted ring. Afterwards, place the 5 eggs nestled evenly into the dough.

Place the ring on a silicone sheet or parchment lined baking tray and continue with the rest of the dough and eggs.

Once you have made all six, place them in a slightly warm oven to rise for about an hour.

After they have risen, remove the tray from the oven and turn it on to 350°F (175°C).
When the oven is at the correct temperature, bake the rings for 20 to 25 minutes or until golden brown, turning the tray midway through baking, if necessary, for even browning.
Remove from the oven and place the Italian Easter bread rings on a cooling rack.

When the bread rings are cool, mix together confectioner’s sugar, vanilla and milk to make a slightly runny glaze. Glaze rings, adjusting with more sugar or milk for correct consistency.
See the photo below: the drip in the forefront ran too quickly, so I made the icing thicker, and you can see it looks much better as it pours onto the ring.

The glaze should slowly drip down the side of the ring.

Immediately add colored sprinkles, if desired, and allow glaze to harden/dry before serving.

See? They’re not difficult to make at all!

NOTE: due to the fact that these are made from brioche dough, iced and have an egg in the middle, I don’t advise making these too far in advance. In fact, I usually have the dough ready and shape and bake them on Easter morning because I love them fresh. If you do make them in advance, try to make them the night before, but if keeping them out for longer than a few hours, or if it’s really warm, they should be refrigerated because of the egg.
Happy Easter!!
Don’t miss another post! Sign up for my free subscription for recipes and travel.
Individual Italian Easter Bread Rings...Easy Step by Step Directions
Ingredients
- 8 eggs 6 should be colored, but still raw; DO NOT USE HARDBOILED EGGS
- 2 Tbsp butter
- ⅔ cup milk
- 3 cups all-purpose flour or more as needed
- ¼ cup sugar
- 1 tsp sea salt
- 1 ½ tsp dry yeast (for bread machine)
For glaze:
- ¾ cup confectioner’s sugar
- 2 Tbsp milk
- ½ tsp vanilla
Instructions
BREAD MACHINE DIRECTIONS (FOR STAND MIXER DIRECTIONS, SEE BELOW.)
- Heat milk and butter gently, in a small saucepan, just until butter melts.
- Remove from heat and place in bread machine pan.
- Beat 2 uncolored eggs, just to break up the yolks, then add to milk and butter in pan. Next, add the dry ingredients: flour, salt and sugar.
- Make a well in the center of the dry ingredients and add the yeast. Set machine for "dough" and press "start."
- The dough will be very soft and pliable, but not sticky. If it is very wet or very sticky, add a little flour and let it knead again. Let rise until doubled.
IF USING A STAND MIXER:
- Place lukewarm milk in a jug and sprinkle the yeast on top with a pinch of sugar, and allow to rest for about 5 minutes. Meanwhile, place the rest of the dry ingredients in the mixing bowl and make a well in the center. Melt the butter, (but make sure it's not hot when you add it to the bowl or it can kill the yeast), and slightly beat the eggs in a separate bowl.
- Pour the milk and yeast mixture, melted butter and beaten eggs into the well in the flour. Using the dough hook, start the machine slowly, until a dough begins to form, then increase the speed a little and allow to knead for about 10 minutes. Dough should be smooth, and a bit firm.
- Cover with plastic wrap and allow to rise until doubled. If it is cold in your kitchen you can place the bowl, uncovered, in your oven, along with a jug of boiling water alongside it (or just keep it covered with the plastic wrap). If you do warm your oven at all, please just turn it on for 1 or 2 minutes, then turn it off, as the bread won't turn out correctly if it rises under overheated conditions). These directions can also be followed if you want to make these by hand.
WHETHER USING THE BREAD MACHINE OR STAND MIXER, CONTINUE HERE...
- Put the dough onto a lightly floured mat or counter and knead gently, then cut into 6 equal pieces.
- Cut each of the 6 pieces in half and roll out to about 9 inches long. It doesn't have to look pretty at this point. Pinch one end together.
- Now twist the two ropes together like this. Again, it won't look very pretty, but it's okay; pinch the other end together.
- Next, join the ends to each other to form a ring, twisting as necessary to keep the ropes from undoing themselves. Place a colored egg into the center of the ring.
- (If you'd like to make ONE large Italian Easter bread ring, do so by using all of the dough to make one large twisted ring. Afterwards, place the 5 eggs nestled evenly into the dough.)
- Place the ring on a silicone sheet or a parchment lined baking sheet and continue with the rest of the dough and eggs.
- Once you have made all six, place them in a slightly warm oven to rise for about an hour.
- After they have risen, remove from the oven and turn the heat to 350°F (175°C).
- When oven is at the correct temperature, bake the rings for 20 to 25 minutes or until golden brown, turning the tray midway through baking if necessary for even browning.
- Remove from tray and place the Italian Easter bread rings on a cooling rack.
- When rings are cool, mix together confectioner's sugar, vanilla and milk to make a slightly runny glaze. Glaze rings, adjusting with more sugar or milk for correct consistency.
- See the photo below: the drip in the forefront ran too quickly, so I made the icing thicker, and you can see it looks much better as it pours onto the ring. The glaze should slowly drip down the side of the ring.
- Sprinkle with colored sprinkles if desired, and allow glaze to harden/dry before serving.
Notes
- You can use 5 eggs and make one large braid if you don't want individual Easter bread rings.
Nutrition
More Italian Easter recipes ~
Sweet Crispy Easter Pasta Nests
Casatiello (Neapolitan Easter Bread)
Christina’s Cucina is a participant in the Amazon Services LLC Associates Program, an affiliate advertising program designed to provide a means for sites to earn advertising fees by advertising and linking to Amazon.com.
Hi! I want to make these this year. Would instant yeast work?
Thanks!
Yes! Enjoy them, Megan and Happy Easter!
Hello Christina, I have been trying to piece together my grandmothers Easter bread recipe but it is very incoherent to me on the paper. I do remember the sweetness of the bread and the joyful colorful eggs & glaze. My question: If I instead wanted to do a single round Easter bread instead of all the mini ones, how would I cut the recipe? Or, would I just use the recipe as is and create one Easter bread?
Im the only one left in the family over the past 40 years who has continued her baking but this is the one that is a stickler for me. Thank you so much for bringing these traditional recipes for everyone to enjoy.
Hi Judy, that’s wonderful that you’re keeping the tradition from your grandmother! Yes, make the recipe exactly as written except divide it in three and make a braid and join it together then put in the 5 eggs. I often do this, too. Enjoy!!
Thank you so much for your reply; I am so delighted to find a site with traditional styles and basic, home pantry ingredients.
I so appreciate your time and effort in making this website, it has inspired me to revisit some of gramma’s old scribbled recipes that she passed to me and help me possibly decipher them a little easier as you have many of the older traditional ones I have drove myself crazy trying to replicate. The last time she and i did hearty baking was in the mid 1970’s as she passed in ’79. Good memories made better in this website thanks to you. Peace~
Im sorry, may I ask one more question: can I add more sugar to give more sweetness or will this affect the overall quality considering yeast in involved? Also, are you using unsalted butter in your baking recipes? Thanks again.
Hi Judy, I’m so please you appreciate my site; yes, it’s a lot of work, but it’s worthwhile when I receive comments like yours!
I wouldn’t add more sugar unless you’re going to skip the icing as it would be much too sweet. There’s only 2 Tbsp of butter in this recipe, so salted or unsalted will work well. Unsalted is the way to go with baking, but always with salt added, but I know many people only buy salted so that’s okay, and skip the added salt. :) Enjoy!
I fully understand, I thank you for the information, it certainly makes sense. Best of luck and I look forward to spending more time here and checking out some of the items you highlight on Amazon. Well deserved. God Bless
Thank you so much, Judy! Looking forward to hearing from you once you’ve tried some recipes :)
Hello! I made this last year and loved it. I want to do it again, but instead of making them a day before, get it together tonight and bake in the morning…I’ve seen a couple comments about having it completely ready for the oven the night before…but would it be better to store the dough in the fridge overnight and THEN shape it first thing in the morning, then allowing the oven rise, then bake? If so, should the dough be taken out of the fridge earlier than the shaping needs to occur so the temperature can get back down to room temp? I want it fresh for Easter lunch tomorrow, but I don’t want to ruin the yeast’s work.
Hi Lindsay, I agree it’s better the day it’s made, however, I’ve never made it beforehand so I don’t know which method would yield the best results. I would probably keep it in the fridge and then shape it and bake it in the morning, if I had to choose. Let me know how it goes and Happy Easter! CC
Happy Easter! He is risen!
So I made it all up to the point of rising for a couple hours on the counter, covered in cling wrap, and put it in the fridge overnight (8-9 hours). Brought it out in the morning and as soon as I tried to knead it, it very obviously lost all of its air at once. So maybe it would have been better if I had kneaded it prior to putting it in the fridge? But I kept going and shaped them and placed them in the warm oven for the next prove. It thankfully got most of the rise back in the warmth, and ended up turning out beautifully.
Side note: I’d heard of some Easter bread recipes including a citrus flavor, so I decided to experiment and add the zest of 2 lemons in the dry ingredient mixture, and we totally loved it.
Happy Easter, Lindsay! That’s not a bad thing! It still rises in the fridge and you’re meant to knead the air out of it (maybe it over proved a little). However, as you discovered, they turned out! Lemon zest would be a lovely addition. Thanks so much for letting me know how they came out! Yay! :) CC
Thanks for great directions and recipe!
You’re so welcome, Lindsay! Hope you discover more of my recipes to enjoy! :)
Cute idea and my girls loved making these, but Ours didn’t turn out nice and fluffy like your pic, our were a little flat
Sorry to hear that, Kristen. Could be a few factors: was your yeast fresh? Maybe it didn’t rise long enough before baking? Not sure what it could be without being there, but hopefully they taste good! Happy Easter!
Hi there!
My family used to have something like this all the time when I was little. About 5 years ago we found out that my mother has major problems with gluten. Do you think this recipe would work with an all-purpose gluten-free flour? I’d love to surprise my mom with these.
Thanks!
Amy
Hi Amy, to be honest, I’ve never baked with gf flour with yeast, so I have absolutely NO idea how it would turn out. It might be grand, and it might be a disaster. If you’re willing to gamble, add some xantham gum (1/4 tsp), cut down on the salt and give it a try, but do let me know how it turns out! Good luck and Happy Easter, CC
No. Gluten free baking will NOT yield the same result, no matter what you do. The gluten is what gives bread it’s texture. I’ve been schooled in and done a lot of gluten free baking. The only baked goods that are still good without regular flour are quick breads like pumpkin bread and pie crust. And those must be eaten the same day as their made because they start to turn gluey, dense and brick like.
Thank you for your input, Melody! I’ve never tried making anything with yeast and gf flour.
I just heard about using King Arthur GF Measure for Measure flour yielding awesome results for those that are gluten free. Give it a whirl…..
Going to try to make for this Easter. May be a silly question: if served with dinner do we just butter roll as s normal dinner roll?
Hi Betsy, these aren’t meant to be served with dinner, but afterwards as dessert. You could reduce the sugar (I would omit it) and not ice them, then you could eat them with your meal. Happy Easter!
What happens to the raw eggs? I’ve never baked Easter bread with raw eggs, can you eat the eggs after will they be cooked?
Oh they are baked, but turn out exactly like hard boiled eggs, Nina! Of course, you can eat them. Just treat them as you would hard boiled. Happy Easter!