

Perfect Yeast Doughnuts (Donut Recipe with 3 Fillings)
Perfect yeast doughnuts are easy to make at home if you have the right recipe. You now have that recipe in your hands (or on your desk). What are you waiting for?

Who can resist perfect, soft and fluffy doughnuts?
As an Amazon Associate I earn from qualifying purchases.

Especially if it is a fresh, fluffy, homemade, perfect yeast doughnut filled with raspberry jam and fresh cream? Not me!

If you think that yeast doughnuts are difficult to make, think again, especially if you own a stand mixer or bread machine. You can make ring doughnuts, filled doughnuts, or doughnut holes. I just want you to know that one batch of these beauties will disappear within seconds. However, don’t take my word for it, read the comments!
You may also enjoy my VEGAN donuts recipe! My dad highly approves, and that’s saying something!
Incidentally, I’ve linked to the bread machine I have, but any bread machine with good ratings will work (like the one I linked to above), and they are much less expensive.

I also have an Italian Christmas doughnut recipe: frittelle! I just LOVE donuts!

Frequently Asked Questions are Under the
Printable Recipe Below
✧
How to Make Yeast Doughnuts
adapted from a recipe in The Bread and Bread Machine Bible
makes about 16 ring doughnuts
SEE PRINTABLE RECIPE BELOW FOR MORE EXPLICIT DIRECTIONS FOR USING A STAND MIXER OR BY HAND
The measurements are critical in this recipe, so a scale is necessary. (This is why there are no cup measurements-please do not ask for them.)
Too many readers were not having success with this solid, tested recipe, and the only reason I can think of is the difference between using cups, versus a scale (volume vs weight). The ONLY way to obtain the correct amount of flour and other ingredients is by weighing them.
FULL PRINTABLE RECIPE BELOW
Ingredients
- water
- buttermilk
- egg
- butter
- all-purpose or bread flour
- sugar
- salt
- regular or quick-rise yeast
- oil for frying
- (sugar for coating the doughnuts)
- (jam, chocolate hazelnut spread, and or whipped cream for filling, if desired)
Special equipment:
- parchment paper, cut into about 4″ squares (smaller pieces for doughnut holes)
- large pot, deep fryer or wok
- a sharp doughnut cutter (a reader asked what I recommend, and I like this one as there is no guessing where the center of the doughnut is–perfect doughnuts every time).
- candy/oil thermometer, not necessary, but very helpful if you’re not a deep-frying pro
- skimmer
Directions to Make the Doughnut Dough
Place the water, buttermilk, beaten egg and melted butter in the bread machine pan or stand mixer bowl, then add the dry ingredients, except for the yeast.

Make a small indentation in the dry ingredients, then add the yeast.

Set the bread machine on the ‘dough’ setting.
If using a stand mixer (see directions in printable recipe below, as steps with the yeast are different), run it with the dough hook, until a soft dough is formed, then cover and set aside until at least doubled in size.
I do not specify a time on the dough rising because there are too many factors that will determine the length of time. Which yeast was used (regular or quick rise), if the yeast was fresh or old (older yeast doesn’t work as well, or sometimes not at all), and the temperature of your kitchen. In my kitchen, this process usually takes 1 to 2 hours.

Roll out the Dough and cut
Once the dough has risen, place it on a floured surface and knead lightly. Divide it in half, keeping half the dough covered, so it doesn’t form a skin.

With a rolling pin, roll out half of the dough to about 1/2″ thickness. (Do not rest the dough.)
Cut with a round, sharp doughnut cutter (about 3″ diameter). Or else use a sharp cookie cutter, then make the holes with a smaller cookie cutter (about 1″ diameter), saving the holes. This is an older photo, I recommend this cutter.

Let the cut Doughnuts Rise
Place each doughnut on a piece of parchment paper, then place on a cookie sheet. Put the tray in the oven (turn it on for 1 minute, SET A TIMER, then turn the oven off again, just to make it barely warm). The oven warming step should not be necessary in the summer unless your a/c is very cool.
Next, boil some water and pour it into a measuring jug or bowl. Place the jug of water in the oven with the tray of doughnuts (this will create steam will keep a skin from forming).

With the remaining dough, divide into quarters, then divide each piece in half to make 8 equal amounts. If you are perfectionistic, you can weigh each piece on a kitchen scale–not that I’d ever do any such thing! ;)

Roll each piece of dough into a smooth ball on a lightly floured surface, and place on parchment or waxed paper pieces and place on a cookie sheet; place in the oven with the other doughnuts and holes to rise until doubled in size.
(Please don’t focus on the time, just go by how they look, but usually anywhere from 1/2 hr to 1 hour is normal for this second rise.) I don’t like to waste plastic wrap, so use the hot water method again.

Fry the Homemade Yeast Doughnuts
Heat the oil to about 350ºF (180º). If you don’t have a thermometer, test the oil with a doughnut hole. If it doesn’t start frying (bubbling) immediately, the oil is too cold, if the hole turns brown right away, the oil is too hot. Adjust the heat accordingly.
Drop the donuts and donut holes into the hot oil using the paper to carefully lower them into the oil.

Turn them over as soon as they become golden brown on the underside, then remove and place on a paper towel lined plate or baking sheet once they are ready.

How Should You Finish Your Donuts
-
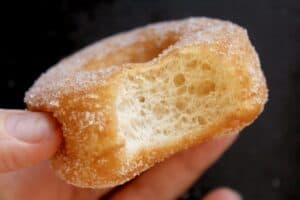
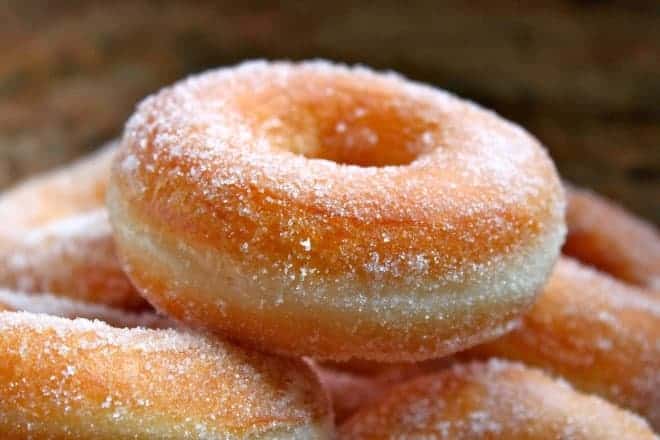
Sugar Coated Doughnuts
When the doughnuts have cooled, roll them in sugar to coat evenly.

You can also use powdered sugar to coat them. I remember liking the Dunkin’ Donuts chocolate kreme filled donuts when I was a young transplant to the US in the late 1970s! They were filled with a fake chocolate “cream” and coated with confectioner’s sugar! I don’t think I’d like them today. Now I’m wondering if they still make them?
Put some powdered sugar in a small bowl and add a little bit of milk or water. Stir and keep adding liquid until you reach a smooth, slightly runny consistency. You want the glaze to run off the doughnuts when you’ve dipped them.

Dip a donut hole to test the glaze, and place it on a cooling rack to set. If all the glaze runs off, add more sugar, and if it’s too thick, add more liquid. No measuring needed.
-
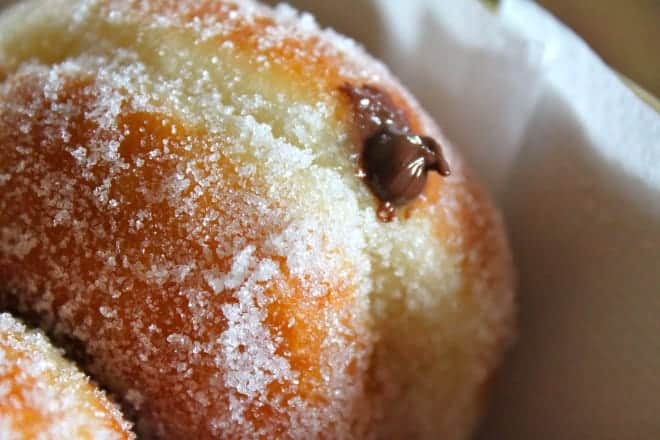
Filled Doughnuts
If you choose to fill the large yeast doughnuts, push a skewer into the center of the doughnut to make a hole. Next, put some room temperature jam, or slightly warmed chocolate hazelnut spread (I’ve gone off Nutella since they’re using tons of palm oil) into a piping bag and pipe the filling into the doughnut.
-
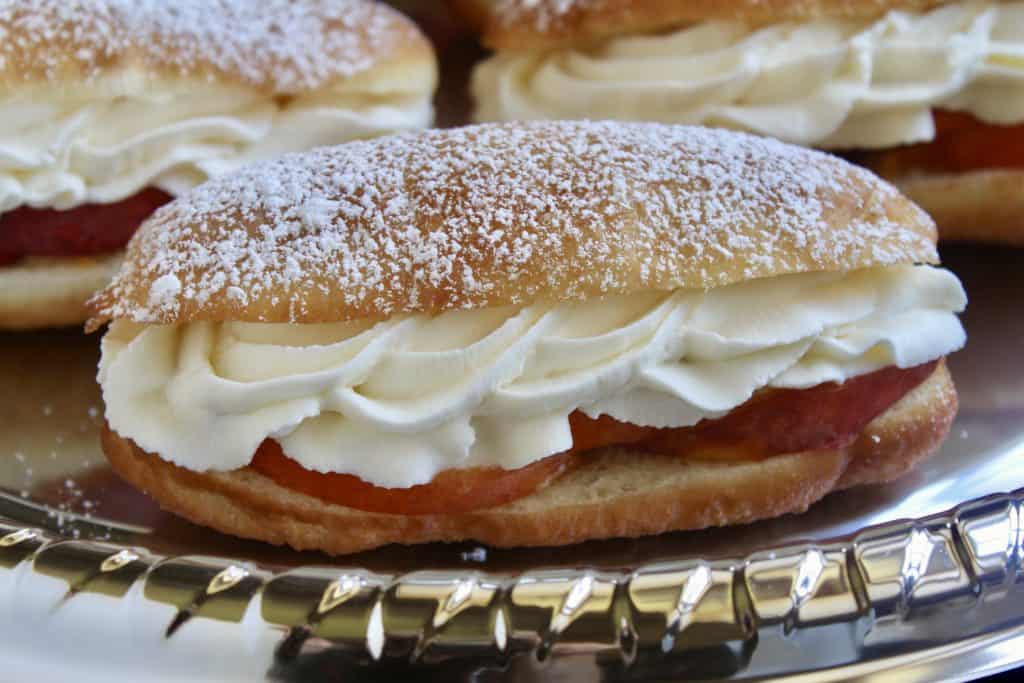
Scottish Style Yeast Doughnuts with Jam and Cream

Of course, it’s perfectly acceptable not to fill them with anything. However, if you like the look of this jam and cream filled doughnut, just slice a long donut in half (without cutting all the way through), at a slight angle, then slather on some raspberry jam. Next, pipe in some real, freshly whipped, unsweetened cream (I used my ISI whipper). That’s it!
If you don’t already know, raspberry jam is a frequent ingredient in Scottish fare, like these coconut and raspberry tartlets.
")
And finally, this is why I shared this doughnut recipe: I recently (now it’s about 10 years ago!) received this message~
“One day at work your brother showed me a picture of some absolutely perfect-looking donuts you made. Any chance of posting that recipe?” -Destruction

Yeast Doughnuts vs. Baked Doughnuts
For me, there is no comparison. Yeast doughnuts are a delight in how simply light and airy they are because they are leavened with yeast. Frying them makes them even lighter. In contrast, baked unleavened donuts, often called cake donuts, seem like a whole other pastry, and are quite heavy and dense. Which do you prefer?
Another of my readers’ favorite recipes: authentic Scottish shortbread

Don’t miss another post! Sign up for my free subscription at the top of this page.
Perfect Yeast Doughnuts
Ingredients
- 6 Tbsp water lukewarm
- 5 oz buttermilk at room temperature
- 1 egg at room temperature
- 2 oz butter melted
- 16 oz all-purpose flour (or bread flour)
- 2 oz sugar
- 1 tsp salt
- 1 ½ tsp quick-rise yeast (or regular dried yeast)
- 16 oz olive oil for frying
- 4 oz sugar (1/2 cup or more as needed for coating the doughnuts)
- jam, chocolate hazelnut spread, and or whipped cream for filling, if desired (various amounts as needed)
Instructions
FOR BREAD MACHINE:
- Place the water, buttermilk, beaten egg and melted butter in the bread machine pan, then add the dry ingredients which were weighed using a scale (it's so important), except for the yeast. Make a small indentation in the dry ingredients, then add the yeast. Set the bread machine on the ‘dough’ setting.
FOR STAND MIXER WITH DOUGH HOOK, OR BY HAND:
- Place the dry ingredients in a bowl. Put 6 Tbsp of lukewarm water in a cup and sprinkle the yeast on top, set aside for about 5 minutes, until the yeast begins to react (you can add a pinch of sugar to help it). Make a well in the center of the dry ingredients, then pour in the buttermilk, egg, melted butter, and yeast mixture. If using a stand mixer, run with the dough hook until a dough forms then continue for about 5 minutes.
- By hand, knead for about 10 minutes. Cover and set aside until at least doubled in size (usually 1 to 2 hours, depending on the freshness of the yeast, temperature of the water and ambient temperature).
BOTH BREAD MACHINE, STAND MIXER/HAND INSTRUCTIONS FOLLOW BELOW:
- Once the dough has doubled, place it on a floured surface and knead lightly. Divide it in half, keeping half the dough covered, so it doesn’t form a skin. With a rolling pin, roll out half of the dough to about 1/2″ thickness.
- Cut with a round, sharp cookie cutter (about 3″ diameter) then make the holes with a smaller cookie cutter (about 1″ diameter), saving the holes. Or splurge (haha) and buy this doughnut cutter and save yourself a lot of trouble!
- Place each doughnut on a piece of parchment or waxed paper, then place on a cookie sheet. Put the tray in the oven (turn it on for 1 minute, SET A TIMER, then turn it off again, just to make it barely warm).
- Next, boil some water and pour it into a measuring jug. Place the jug of water in the oven with the tray of doughnuts (this will create steam will keep a skin from forming). With the remaining dough, divide into quarters, then divide each piece in half to make 8 equal amounts. Roll each piece of dough into a smooth ball, and place on parchment or waxed paper pieces and place on a cookie sheet; place in the oven with the other doughnuts to rise until doubled in size.
- Heat the oil to about 350ºF (180º). If you don’t have a candy thermometer, test the oil with a doughnut hole: if it doesn’t start frying immediately, the oil is too cold, if the hole turns brown right away, the oil is too hot. Adjust the heat accordingly.
- Drop the doughnuts into the hot oil using the paper to carefully lower them into the oil. Turn them over as soon as they become golden brown on the underside, and remove them and place on a paper towel lined platter once they are ready.
- When the doughnuts have cooled, roll them in sugar to coat evenly. If you choose to fill the large doughnuts, push a skewer into the center of the doughnut to make a hole, then place some room temperature jam, or slightly warmed chocolate hazelnut spread into a piping bag and pipe the filling into the doughnut. Using an iSi Whipper or piping bag, pipe fresh cream into a doughnut cut in half (add some jam first if you like).
Notes
Nutrition
Tips and Questions
Please do not write to ask me any questions if you did not weigh the ingredients, or follow the directions as written. As you can see, there are over 1000 comments and many are questions; please read the following FAQs first.
Question: Can I make the dough ahead of time and fry them the next day?
Answer: Yes! Make the dough and put it in the refrigerator in a sealed container, (but it needs room to expand) and then bring to room temperature, roll and cut and continue. Just remember: the dough will form a skin if exposed to the air and it will ruin your doughnuts. Always keep the dough either in a sealed container or in the oven, with a little hot water for humidity.
Question: My dough is very sticky, even after letting it knead for over 5 minutes after it formed a dough; what did I do wrong?
Answer: If you weighed the ingredients and didn’t make a mistake, it may just be the flour you’re using, the humidity in the air or another factor. Just add a little flour, just enough so that you can work with the dough. However, if you add too much flour, your doughnuts won’t be light.
Question:Can I bake the doughnuts?
Answer: No, unfortunately, they simply won’t turn out anything like they’re supposed to. I do not recommend it because these are meant to be deep fried.
Question: Can I substitute x ingredient?
Answer: I have successfully made these yeast doughnuts without eggs, butter and milk. Please look at the following recipe to substitute any of these: VEGAN YEAST DOUGHNUT RECIPE.
Question: Can I use instant yeast?
Answer: Yes. Instant yeast is the same as quick-rise yeast.
Question: Can I freeze the doughnuts once they’ve been fried?
Answer: The fried doughnuts can be frozen, but I honestly wouldn’t recommend it. These yeast doughnuts are best when eaten fresh, just like a French baguette. Day old doughnuts are no fun!
Question: I don’t have buttermilk, what else can I use?
Answer: Use regular milk with a little lemon juice (1/2 tsp.)
Question: What temperature do I set the oven to when I’m warming it up to proof my dough and doughnuts?
Answer: It doesn’t matter; whether it’s set to 150 F or 200 C, you’re only leaving the oven on for a few seconds, then turning it off, so there’s not enough time for it to get up to any set temperature.
Shop some of my favorite doughnut items,
kitchen tools and more in my Amazon shop,
Christina’s Cucina is a participant in the Amazon Services LLC Associates Program, an affiliate advertising program designed to provide a means for sites to earn advertising fees by advertising and linking to Amazon.com.
I have been looking for a great new recipe to try for Yeast Doughnuts and I think I have found the Perfect one! Thank you for sharing, I can’t wait to try your recipe.
Yes Heidy, this is it! I’m not being conceited because it’s not my recipe-it’s just a fabulous one! Enjoy!
Hi Christina
Can we use plain or self raising flour instead of all purpose
Sorry, Shereen-I will fix the recipe to specify that PLAIN is the same as ALL PURPOSE (that’s what it’s called in the US). Don’t use self raising. Good luck! :)
Hi , can I use something else instead of eggs .
The only thing I might suggest is an egg-substitute, but honestly don’t know how they would turn out without eggs.
Harpreet, we use ground chia seed; 1Tbsp of ground chia seed to 3-4Tbsp water = 1egg. Can’t tell a difference in taste, in fact sometimes we think it tastes better. other than tiny little dark green specks in lighter recipes (like doughnuts) you can’t tell a difference visually either. Give it a try!
Hey Christina, I think your doughnut recipe is dope, from the pictures, I have been trying and searching for a perfect doughnut recipe and bumped on your site, I am planning on trying it out tomorrow, I wanna ask, I don’t have an oven in my house now, ( just moved)… So how do I or what do I alternate with that ‘hot water and keeping in oven to rise’ step with.? I think that’s the only place I have issues with. Thank you.
Hi Mary! I’m sure you’ll be delighted with the results as long as you use a scale to weigh the ingredients. Regarding proofing in the oven, I actually just edited my post to say that this isn’t necessary in the summertime. Unless you have your a/c on very cold, it should rise just fine on your counter. Even in winter, if you didn’t have an oven, it would just take longer for the dough to rise, so it won’t affect the results.
Congrats on your move, and good luck-let me know how they turn out! CC :)
THANK YOU SO MUCH FOR THIS *PERFECT* RECIPE!! The donuts turned out PERFECT the first time I made them! I have tried it twice already! Christina you are amazing :)
Haha, Afraa! I’m not amazing, but the recipe is! I’m so happy that you let me know they turned out so well! All these comments are making me have serious doughnut envy! I need to make them again, too!
Thanks again and hope you enjoy my other recipes :) CC
Hi Christina,
Thank you for this delicious recipe. The taste and texture is great. But the shape of my doughnuts are not as pretty as yours. It was quite stretchy when I cut them out. It shrunk and went out of shape. Could you kindly let my know what happened to my dough? Thank you
Hi Mabel, I’m so glad that the taste and texture was great for your doughnuts, but without being in your kitchen to see what happened, I’m afraid I don’t know what to tell you. Maybe the dough was a little too soft? I’m sorry I can’t be more helpful. CC
Hi Christina,
Thank you for your reply. May I know if resting the dough is needed before cutting? Thank you
No Mabel, the dough shouldn’t rest before cutting the doughnuts. Did you do this? If so, this could very well be the reason for your difficulties. I try not to miss any steps in my directions as I know many people are making things for the first time. I would have added that step if it was needed. Good luck next time!! Let me know how it goes- CC
Hi Christina,
I didn’t rest the dough. I tried another recipe which needed the rest. But my friends and family prefer your recipe so I wanna make ture everything is right before I try it again tonight. I thought I might have played with the dough too much so the gluten has formed that makes it stretchy. Is it possible?
Honestly, I don’t know what could have happened, Mabel. If you follow the directions explicitly, it should turn out like mine (and others who successfully made them). Let me know how it goes! Good luck! :)
Wow! I am definitely going to make these ASAP. They look absolutely amazing. I will be making these for our hungry boy scouts. Any way I can triple or quadruple this recipe? Any tips would be much appreciated, thanks.
Oh goodness, you’ll need a lot of doughnuts! haha! I honestly wouldn’t make more than double the recipe at a time, and even with that, sometimes recipes are difficult when doubled. Please do use a scale as making more will only make it more important that the measurements are correct :) Let me know how it goes! CC
I have personally made these donuts, following Christina’s directions exactly, weighing etc. They turned out absolutely delicious and I am making them again tomorrow. It’s been about 6 weeks since I made them the first time, no problems, easy directions and, of course, the using of the bread machine is a HUGE plus! I filled with homemade pastry cream, but I have some SF strawberry jam I am going to use for some of them as I have to watch my sugar, and the dairy cream can make me a little sickly. Lol
Thank you for your wonderful review, Karen! So glad you’ll be indulging again, tomorrow! Enjoy! CC
Christina, I went to make these as our pastry cream was made yesterday and is chilling. And discovered I only gave heavy cream and half and half, no buttermilk. Can I make the fake buttermilk with vinegar or lemon juice? Or use HWC or half and half. I don’t buy milk at all other than. BM, HW, and half and half, and almond milk
Hi Karen, not having used half and half with lemon juice or vinegar, I can’t say for sure, but I think it should work. What I would do is add some water (so maybe 4 oz of the half and half and 1 ounce water). Remove a teaspoon of water first, and replace it with the vinegar or lemon juice. Let me know how it goes! Btw, buttermilk is a fabulous thing to have on hand if you bake-it lasts a long time and makes everything rise better. Good luck!
I know. I always have buttermilk on hand, along with HWC, and 1/2 and half. But lately when I do my on line ordering for Sam’s Club, they don’t have it listed. But they have in store. And of course, I don’t feel like walking to the back lol. I may wait and make them tomorrow after we pick up our order at Sam’s. Thanks !
How funny! Let me know how it goes! :)
Thank you so much for this recipe, i tried it and it was amazing. my family loved it so much. i have a question though, can i bake them and will it come out soft and tasty like the fried one or do i have to make an adjustment. pls reply. thank you
Hi Mariam, I’m so glad they turned out for you! They will not turn out as tasty if you bake them, much as french fries taste much different than potatoes that are baked (even if they are cut up). I have not ever tried baking them, so I don’t know what the results would be, but you could always give it a try (I would try baking one or two, not the entire batch the first time.) Please do let me know if you try it- have a good weekend! CC