
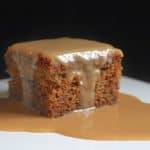
Sticky Toffee Pudding--Heaven on a Plate!
One of the best desserts ever invented. If you don't believe me, give it a try and tell me I'm wrong.
Equipment
- 1 9"x9" baking pan preferably not a dark pan
Ingredients
Cake
- 1 ¼ c Medjool dates finely chopped
- 8 oz water boiling
- ½ cup unsalted butter room temperature
- 1 cup packed golden brown sugar
- 4 eggs large, preferably organic
- 1 ¾ c flour all purpose
- ½ tsp baking powder
- 1 tsp baking soda
- 2 Tbsp instant coffee granules
- 1 pinch salt
Sticky Toffee Sauce
- ¼ cup butter unsalted
- 1 cup brown sugar packed, (light or dark)
- 2 cups heavy whipping cream (preferably organic)
- 1 Tbsp Drambuie liqueur (optional - or good quality whisky)
- 1 pinch salt
Instructions
- Oven temperature is 350°F (175°C) but don't preheat it yet.
Make the Cake
- Butter the pan (preferably not dark.)
- Place chopped dates in small bowl, then pour 1 cup boiling water over the dates and let cool, about 1 hour.
- Mix flour and baking powder and set aside.
- Now preheat the oven to 350°F (175°C).
- Using electric mixer, beat butter and sugar in large bowl to blend.
- Scrape sides of bowl often. Add 2 eggs, 1 at a time, beating well after each addition, and scraping down the bowl.
- Add half of flour and baking powder and beat to blend.
- Next, add the remaining 2 eggs, one at a time, beating to blend after each addition. Continue scraping down sides of bowl.
- Now add the remaining flour and beat until blended.
- Combine instant coffee and baking soda in small bowl.
- Pour the coffee and soda into the date mixture, stirring to dissolve the coffee granules. It will froth slightly. At this point, you can leave the mixture as is, or blend with an immersion blender which makes gives a more even texture throughout the cake.
- Add the date mixture to the batter in the bowl, and mix until evenly combined.
- Pour the batter into prepared pan.
Bake the Cake.
- Place on rimmed baking sheet and bake until tester inserted into center comes out clean, about 50 minutes to 1 hour.
- Let the cake cool in the pan. After it has cooled, you can level off the top of the cake if necessary. Carefully remove the cake from the dish, then level and remove the top. I like using a cake leveler. Place the cake back into the pan. Poke holes all over the cake with a skewer or toothpick.
Make the Sticky Toffee Sauce.
- Bring cream, brown sugar and butter to boil in heavy medium saucepan over medium-high heat, stirring frequently.
- Reduce heat to medium-low and simmer sauce until reduced to 1 3/4 cups (12 oz), stirring occasionally, about 15 minutes. If adding the Drambuie, add it after taking the sauce off the heat.
- When cake is cool and caramel sauce is still warm, but not too hot, pour about half of the sauce over the cake. Let cool to room temperature, then refrigerate, without covering. After an hour or so, when the sauce has become firm, cover the dessert with cling film (once cool the plastic won't stick to it.)
How to Serve Sticky Toffee Pudding
- When serving, cut a piece and heat in microwave until the caramel melts; the dessert should be hot and steaming. Serve with the reserved, warm sticky toffee sauce and freshly whipped cream.
Notes
- This is in my top 5 desserts of all time.
- As always, use a scale for best results.
- I like it with the dates in pieces, as well as blended. Try it both ways and see if you prefer one way over the other.
- This dessert freezes perfectly.
Nutrition
Serving: 1piece | Calories: 464kcal | Carbohydrates: 45g | Protein: 9g | Fat: 28g | Saturated Fat: 17g | Polyunsaturated Fat: 2g | Monounsaturated Fat: 8g | Trans Fat: 0.5g | Cholesterol: 132mg | Sodium: 239mg | Potassium: 268mg | Fiber: 2g | Sugar: 29g | Vitamin A: 1050IU | Vitamin C: 0.2mg | Calcium: 79mg | Iron: 2mg
DID YOU MAKE THIS RECIPE?Please leave a review by clicking on the RATE button above in the purple header or share a photo and tag @ChristinasCucina on Instagram!